Dutch Barn Shed Blueprints - Things To Think of When Making A Backyard Shed
How to get the proper permit to start creating an outbuilding
There is a common misconception that designing permits are only required for backyard outhouse drawings larger than 100 sq. feet ( click here to find out more on the topic of schematics ). Keep in mind that most towns require you to apply for and receive a permit before starting construction. It is important to get a proper permit so that you will not be forced to disassemble your outhouse if it isn’t to code. The building assessor can be very helpful and a wealth of information about your town’s constructing codes. He can also make suggestions that will save you money and time in the long run. Building inspectors can recommend the best constructing technique and materials for your space. Inspectors will also want to make sure the shed is built to code so that it won’t collapse. Town officers will endorse your site after they are sure it is not sitting over a septic system or encroaching into wetlands. Also if you build a shed without a permit the city may make you move it or completely take it down. Since every town is different you should call your town's putting together branch for current regulations.
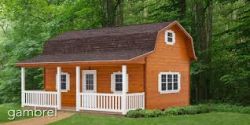
When making your outbuilding assembly diagrams consider including the new models made of treated wood ( http://www.shedplansz.com/lean-to-shed-plans ). The plastic material used in addition with the wood makes the putting together strong yet lighter than other sheds. Treated wood sheds are UV-protected and stain-resistant so they will not crack or fade. You can find wood shed kits available in a variety of sizes and some companies even offer expansion kits. Using a wooden shed kit is an easy task and it costs less than its plastic or metal counterpart. outbuildings made of prefabricated wood are known for their strength and durability. Look for models that have storage room directly above instead of using the walls to hang weighty tools. A double-walled prefabricated outbuilding will increase the sturdiness of your building. You will be able to paint and shingle your wooden outbuilding to match your house or mood. Upgrading your prefabricated shed is easy with accessory options like skylights and shelving.
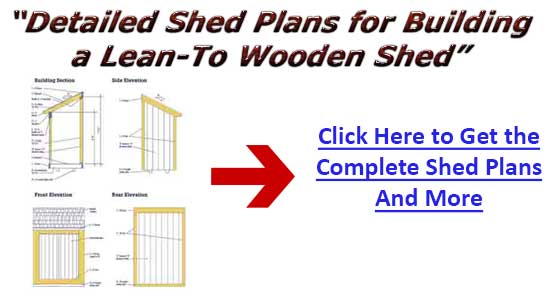
In order to provide support for your roof and floor it is necessary to build correct framing. To build a wall frame you will need 2x4 pieces of wood and either nails or screws. Cut the timbers to the shed plan's specified measurements for your back wall frame. These pieces should be fastened together to make a simple rectangular frame. The key to easily framing the exterior outhouse walls is to make sure the walls are square and level. Once the wall is level you can support it by spacing the remaining 2x4s two feet apart from each other inside the frame. Add ¾-inch plywood to make your frame sturdier and more durable. Simply turn over the wall once you have constructed it and it shall be ready for installation. Follow suit with the remaining walls and be sure you are leveling the angles at all times. Once the back wall has been affixed you can raise all 4 exterior walls.
There is a common misconception that designing permits are only required for backyard outhouse drawings larger than 100 sq. feet ( click here to find out more on the topic of schematics ). Keep in mind that most towns require you to apply for and receive a permit before starting construction. It is important to get a proper permit so that you will not be forced to disassemble your outhouse if it isn’t to code. The building assessor can be very helpful and a wealth of information about your town’s constructing codes. He can also make suggestions that will save you money and time in the long run. Building inspectors can recommend the best constructing technique and materials for your space. Inspectors will also want to make sure the shed is built to code so that it won’t collapse. Town officers will endorse your site after they are sure it is not sitting over a septic system or encroaching into wetlands. Also if you build a shed without a permit the city may make you move it or completely take it down. Since every town is different you should call your town's putting together branch for current regulations.
When making your outbuilding assembly diagrams consider including the new models made of treated wood ( http://www.shedplansz.com/lean-to-shed-plans ). The plastic material used in addition with the wood makes the putting together strong yet lighter than other sheds. Treated wood sheds are UV-protected and stain-resistant so they will not crack or fade. You can find wood shed kits available in a variety of sizes and some companies even offer expansion kits. Using a wooden shed kit is an easy task and it costs less than its plastic or metal counterpart. outbuildings made of prefabricated wood are known for their strength and durability. Look for models that have storage room directly above instead of using the walls to hang weighty tools. A double-walled prefabricated outbuilding will increase the sturdiness of your building. You will be able to paint and shingle your wooden outbuilding to match your house or mood. Upgrading your prefabricated shed is easy with accessory options like skylights and shelving.
In order to provide support for your roof and floor it is necessary to build correct framing. To build a wall frame you will need 2x4 pieces of wood and either nails or screws. Cut the timbers to the shed plan's specified measurements for your back wall frame. These pieces should be fastened together to make a simple rectangular frame. The key to easily framing the exterior outhouse walls is to make sure the walls are square and level. Once the wall is level you can support it by spacing the remaining 2x4s two feet apart from each other inside the frame. Add ¾-inch plywood to make your frame sturdier and more durable. Simply turn over the wall once you have constructed it and it shall be ready for installation. Follow suit with the remaining walls and be sure you are leveling the angles at all times. Once the back wall has been affixed you can raise all 4 exterior walls.
Use this guide to narrow down your choices for shed doors
In your shed drawings you will need to decide between hinged or sliding doors ( dutch barn shed blueprints ). A benefit of doors that are fastened with hinges is that they take up a minimum amount of space. Sliding doors glide out of the way completely and are easier to install because they don’t have to be stiff. Sliding doors will require a lot of wall area in order to function correctly. For smaller sheds it is recommended to use a single door with hinges. Regardless of the type of door that is used the wall with largest breadth is the ideal location for installation. Measure twice and cut once to ensure the lengths and heights are correct. Nothing is more irritating than having a door that is ill-fitting. If you decide to use a hinged door there are many different styles available. If you use hefty sized wood for the door opt for extra tough hinges.
In your shed drawings you will need to decide between hinged or sliding doors ( dutch barn shed blueprints ). A benefit of doors that are fastened with hinges is that they take up a minimum amount of space. Sliding doors glide out of the way completely and are easier to install because they don’t have to be stiff. Sliding doors will require a lot of wall area in order to function correctly. For smaller sheds it is recommended to use a single door with hinges. Regardless of the type of door that is used the wall with largest breadth is the ideal location for installation. Measure twice and cut once to ensure the lengths and heights are correct. Nothing is more irritating than having a door that is ill-fitting. If you decide to use a hinged door there are many different styles available. If you use hefty sized wood for the door opt for extra tough hinges.
