Log Wood Shed Designing Plans - Get Fantastic Ways For Building A Shed
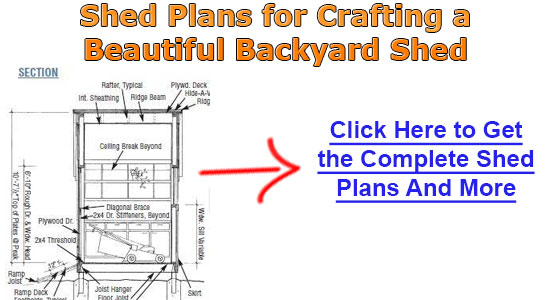
The roof trusses will be an important element in the backyard shed assembly diagrams because they support the plywood and shingles that make the roof waterproof ( 10x12 shed plans ). Using your floor to bring together trusses is the ideal location as it will prevent bends from forming. Choose a sunny day to start working on your roof truss so that you don’t get any timber damp. Framing a roof in the traditional manner using individual rafters can be a challenge for someone who has never tried. With prebuilt roof trusses you will cut out most of the work on the ladder. Roof trusses consist of a prefabricated assembly of two rafters fastened to a ceiling joist. Plywood reinforcement plates should be used to hold roof trusses together. Position your trusses at least sixteen inches apart when installing. Manufactured roof trusses in standard sizes are inexpensive and easy to use. You can find many different kinds of prebuilt trusses in any home center.
Discover how prefabricated sheds will work better for your project
Prefabricated wooden outbuildings are the newest type on the market and would work well with budget outbuilding building diagrams ( look at here ). High-density polyethylene combined with wood creates an outbuilding that is resilient and sturdy. Treated wood outbuildings are UV-protected and stain-resistant so they will not crack or fade. Producers of manufactured wooden outbuildings have many size options and kits for shed extensions. Neither knowledge of carpentry nor many tools are necessary in constructing a simple prefabricated outbuilding. outhouses made of prefabricated wood are known for their strength and durability. Look for models that have storage room directly above instead of using the walls to hang weighty tools. Some manufacturers use combined support and a double-wall wooden panel construction for complete resilience. Wooden outhouses can be painted plus they have many different patterns from which to choose. Another bonus of manufactured sheds is that they are virtually effortless to renovate.
In your backyard outhouse crafting diagrams make sure your outhouse is safe and secure by adding some easy safeguards. Fit your door and window with good bolts and make sure that you lock it every time. Invest in timers that turn lights on and off inside your shed if you go out at night. Check fences and hedges bordering rural properties to identify weak spots that could provide easy access to criminals. Obscure the windows of your outhouse to prevent potential thieves seeing what you have inside. Outside door hinges should be secured with coach bolts instead of normal screws. Get your property and tools engraved or mark them with paint or another permanent ink. If your property is stolen it will be easier to identify and return with your identifiable markings. Add extra fortification to your outhouse by layering the inside with supplementary boards according to your outdoor outhouse blueprints. Use a metal cage and keep it locked when your outhouse is unattended to ensure valuable equipment is safe.
Learn how you can appropriately build a frame for your outbuilding
In order to provide support for your roof and floor it is necessary to build correct framing ( log wood shed designing plans ). Necessary materials for framing include 2X4 timbers and attachments such as nails. Cut the timbers to the outbuilding plan's specified measurements for your back wall frame. Once the wood is cut you can connect the pieces with screws to arrange a frame. It is very important that you ensure all sides of the frame are level with each other. Support your wall by placing more 2X4s every two feet in the interior of the frame. Another way to increase the strength of your exterior walls is to apply plywood to the frame. When the rear wall is built flip it over to have it in the correct position to stand. Follow suit with the remaining walls and be sure you are leveling the angles at all times. Once the back wall has been affixed you can raise all 4 exterior walls.
In order to provide support for your roof and floor it is necessary to build correct framing ( log wood shed designing plans ). Necessary materials for framing include 2X4 timbers and attachments such as nails. Cut the timbers to the outbuilding plan's specified measurements for your back wall frame. Once the wood is cut you can connect the pieces with screws to arrange a frame. It is very important that you ensure all sides of the frame are level with each other. Support your wall by placing more 2X4s every two feet in the interior of the frame. Another way to increase the strength of your exterior walls is to apply plywood to the frame. When the rear wall is built flip it over to have it in the correct position to stand. Follow suit with the remaining walls and be sure you are leveling the angles at all times. Once the back wall has been affixed you can raise all 4 exterior walls.
